People Tab
The people tab includes options to view and add new contacts, drivers or employees. Any people that are designated as Contacts will be available in the Lookup for Contacts. For the Contacts only, all places in Nexsure where the contact's information is used will be updated if a change is made in one place.
To Navigate to the People Tab
- On the Primary
menu,
click SEARCH. Search for the appropriate client.
- Click the client's Details
 icon.
icon.
- Click the people
tab. The People Summary screen is displayed.
Tip: Columns on the summary screens can be sorted in either ascending or descending order by clicking the column heading.
- In the View list, Contacts is displayed by default. The summary of all people designated as Contacts is displayed on the summary screen. Selections can be made in this list to display the summary screens for people marked as Drivers and / or Employees as well.
Note: Access to each View is dependent on the security setup.
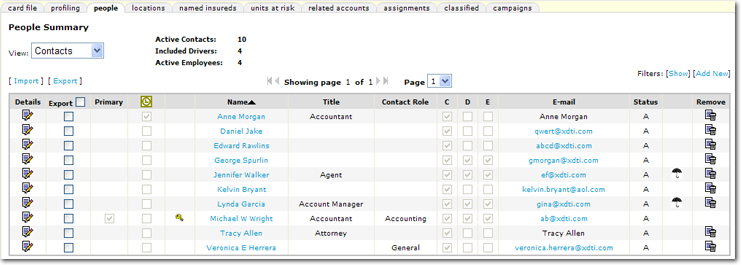
The following options and information are displayed on the People Summary screen:
- On the People Summary screen, the ability to [Import] and [Export] lists of people is available. When working with imports and exports:
- An export must be performed first to get a working spreadsheet for importing.
- Use the check boxes to select the people to be exported.
- If the Select All check box is selected when exporting, all returned records, including those on subsequent pages will be exported. Up to 5000 records will be exported.
- Only the primary personal phone number will be exported, all other numbers cannot be imported.
Important: System generated IDs on the exported spreadsheet should not be changed, added or copied. The absence of an ID upon import will denote an item to be added.
- Place a capital X in the Remove
 column in order to remove the item upon import.
- A record cannot be removed if the person is associated with a policy.
- A record cannot be removed if the person is designated as a Driver and / or Employee.
Tip: In order to avoid updates occurring to records that have not changed, it is suggested that those records be removed before the import takes place.
- When searching for people, use the Filters by clicking [Show]. Each View (Contacts, Drivers, and Employees) contains different filter options.
Note: In the Drivers filter, the Status list is for the driver's status on the policy (included / excluded) not that they are active or inactive for the client.
- When working with any of the people types, the [Add New] link can be clicked to add a new record. See the Adding People topic.
- When viewing Contacts, column headers can be clicked to sort the summary by the selected column header in ascending or descending order. The following columns can be sorted:
- Primary
- Name
- Title
- Contact Role
- E-mail
- Status
- Details: Click on the Details icon to open the People Information screen and edit the person's information.
- Export: Select the records to be exported by selecting the export check boxes. If all check boxes need to be selected, put a check mark in the box at the header. If the select all check box in the header is selected before the export, all records on all resulting pages will be exported up to a count of 5000. This includes all pages of records from the results.
- The following are the results columns that are located on the Contacts View:
- When viewing Contacts, column headers can be clicked to sort the summary by the selected column header in ascending or descending order. The following columns can be sorted:
- Primary
- Name
- Title
- Contact Role
- E-mail
- Status
- Primary: Indicates whether the person is the primary contact. Unlimited people may be associated to a client, however only one may be designated as the primary. The primary designation may be changed, but a person currently designated as primary may not be deleted. To change a Primary Contact see Changing a Primary
Contact.
- Microsoft® Outlook®: Click the Microsoft Outlook
 icon to synchronize Contacts with the user's Microsoft Outlook files. Only people designated as Contacts can be synchronized with Outlook.
- Security: A Key
 icon will be displayed if the person has security rights to a Nexsure portal.
- Title: The contact's title as selected on the Contact Information screen.
- Contact Role: The role of the contact for the account as selected on the Contact Information screen.
- The following are the results columns that are located on the Drivers View:
- When viewing Drivers, column headers can be clicked to sort the summary by the selected column header in ascending or descending order. The following columns can be sorted:
- Driver #
- Name
- License #
- State Licensed
- Date of Birth
- Years Experience
- E-mail
- Status
- Driver #: The number assigned to the driver in the Driver Information section of the people details tab.
- License #: The number added to the Driver Information section of the people details tab.
- State Licensed: The state indicated in the Driver Information section of the people details tab.
- Date of Birth: The date entered in the Driver Information section of the people details tab.
- Years Experience: The number of years entered in the Driver Information section of the people details tab.
- The following are the results columns that are located on the Employees View:
- When viewing Employees, column headers can be clicked to sort the summary by the selected column header in ascending or descending order. The following columns can be sorted:
- Name
- Title
- Date Hired
- WC Emp. Status
- E-mail
- Status
- Title: The contact's title as selected on the Contact Information screen.
- Name: The name of the contact. Click on the name and the Contact Record dialog box is displayed.
- C / D / E: Designates the classification of a person as marked on the Contact Information screen. The letters stand for the following:
- C: Contact
- D: Driver
- E: Employee
- E-mail: The first email address of the person as entered on the Contact Information screen.
- Status: Indicates whether the person is Active or Inactive on the Contacts and Employees views. On the Drivers view, the Status column holds the status of the driver on the policy such as Included or Excluded.
- Linked Unit: The Umbrella
 icon is displayed once a unit (People, Named Insureds, Locations, Vehicles) has been linked to a policy using the Lookup feature in an application.
- Remove: Click the Remove icon to remove the person from the client records. The primary contact cannot be removed until another primary is selected.
Note: The person must be removed from the Driver and Employee lists before they can be removed from the client record. Use the people details tab to access and remove selections from the Driver and Employee check boxes one at a time. If a person is marked both Driver and Employee and they need to be removed, access the people details tab and remove one designation, such as Driver a dialog box will confirm and save the change and the summary screen will again be displayed. Return to the people details tab and remove the second designation separately.
Adding People
Editing Client Contacts